传统编译器和深度学习编译器的调研和理解
本文介绍传统编译器框架和深度学习编译器框架,通过两者对比说明了我对编译器的简单理解
Part One : 传统编译器
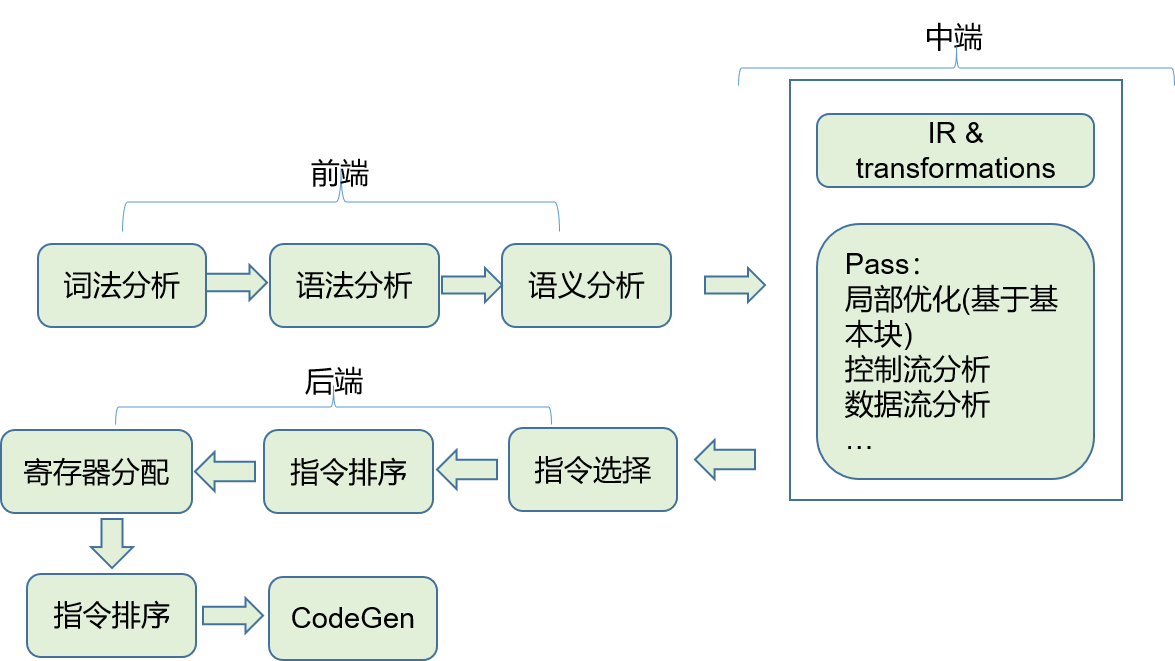
编译器就是一个将编程语言所编写的程序翻译成另一种目标语言的程序。传统编译器的执行流程如下所示
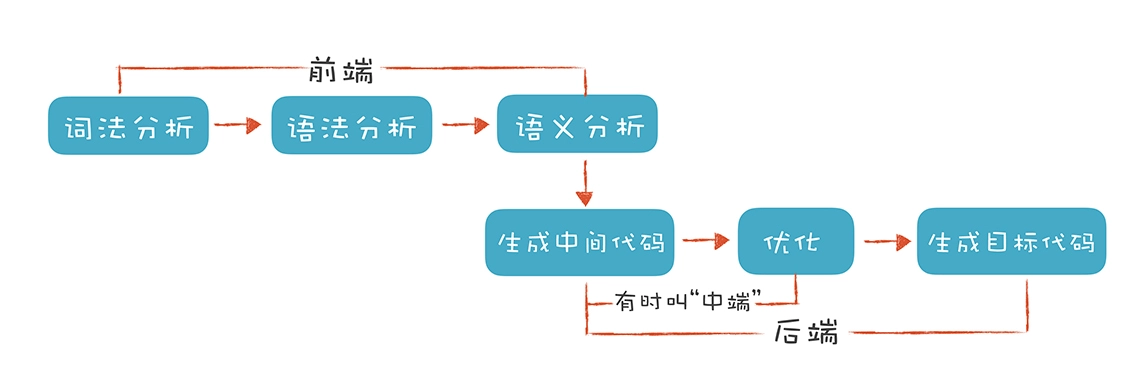
编译器的前端技术分为词法分析,语法分析,语义分析三个部分,后端部分从生成中间代码,到各种优化,到最终生成目标代码的过程,有时又会将中间代码和优化部分称之为中端。
下文将从前端,中端和后端三个角度来阐述。
1.1 前端

词法分析器 scanner 以源代码作为输入,将源代码转换成 token stream,然后传递给 parser 进行处理,parser 按照语法规则,对 token 进行处理,然后生成一棵抽象语法树。在抽象语法树的基础上,进行类型检查,比如类型绑定,类型推导,变量消解等语义相关操作。我们可以直观的看下这个过程。比如对下面这段简单的代码片段进行词法和语法解析
int main(int argc, char **argv)
{
    printf("Hello, World!\n");
    return 0;
}
生成的tokens如下所示,每一个token都会有其编号、所在文件中的位置、内容以及类型信息,经过语法分析器处理后生成抽象语法树
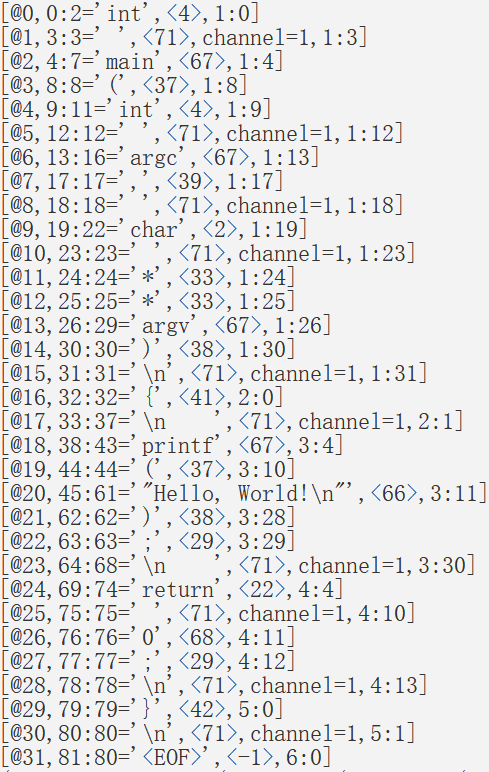
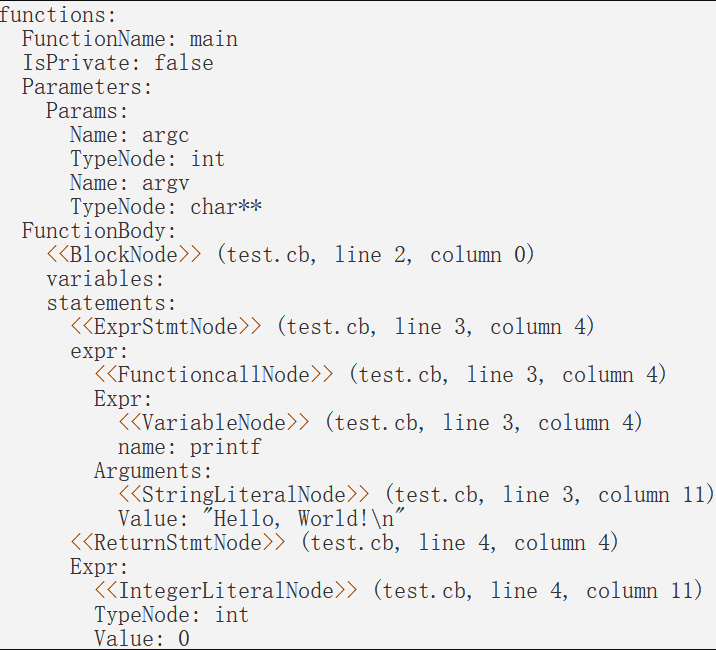
抽象语法树中,整个源代码片段被组织成了一棵树的形式,源代码中的每一行语句都对应了树中的一个有实际含义的节点。
1.2 中端
编译器经过前端部分处理之后,生成抽象语法树,然后将抽象语法树转换成中间表示(IR, intermediate representation)。从抽象层次上,可以将 IR 归结为 HIR,MIR 和 LIR 这三类。
抽象语法树可以算作一种 HIR,在这个层次上可以做一些高层次的优化,比如常数折叠,内联等。
MIR 是独立于源语言和硬件架构的,所作的优化都是机器无关的优化工作,常见的形式有三地址代码(three address code, TAC)的形式。TAC的特点是,最多有三个地址(也就是变量),其中赋值符号的左边是用来写入的,而右边最多可以有两个地址和一个操作符,用于读取数据并计算。
x = y op z
x = uop y
x = y
goto I
if x goto L
if x op y goto L
比如
do {
	i = i + 1;
	a[i]++;
} while (a[i] < v)
TAC 的形式为
L: i = i + 1
t1 = a[i]
t1 = t1 + 1
if t1 < v goto L
在 TAC 基础上,在三地址代码上再加一些限制,就能得到另一种重要的代码,即静态单赋值代码(Static Single Assignment, SSA),在静态单赋值代码中,一个变量只能被赋值一次,来看个例子。
y = x1 + x2 + x3 + x4 的普通三地址代码如下:
y = x1 + x2;
y = y + x3;
y = y + x4;
其中,y被赋值了三次,如果写成SSA的形式,就只能写成下面的样子:
t1 = x1 + x2;
t2 = t1 + x3;
y  = t2 + x4;
明确了 use-define 的关系,每一个变量只会定义一次,可以多次使用,这种特点使得基于SSA更容易做数据流分析,而数据流分析又是很多代码优化技术的基础,所以,几乎所有语言的编译器、解释器或虚拟机中都使用了SSA,因为有利于做代码优化。
而基于 MIR 所作的优化方法很多,这里只是介绍几个跟我们后面理解 AI 编译器有关的几个优化方法,提供一点思路。
常见的优化
思路1: 把常量提前计算出来
比如表达式 x = 2 * 3,就可以提前将表达式的值计算出来,优化成 x = 6。这种优化方法就叫做常量折叠(constant folding)。
对于 x 这个变量,已经知道了它的值就是 6,在后面表达式计算中如果使用到了 x,就可以直接将 x 的值替换成 6,这种优化方式叫做常量传播(constant propagation)。而替换 x 后,可能又会找到新的常量折叠和常量传播的优化机会。
思路2: 用低代价的方法做计算
比如 x = x + 0,操作前后 x 没有任何变化,这行代码可以直接删掉。又比如 x = x * 0,可以简化成 x = 0,这种优化方法就叫做代数简化(algebra simplification)。对于有些 cpu 来说,乘法运算改成移位运算会更快,比如 x * 2 优化成 x << 1,x * 9 优化成 x << 3 + x,这种就叫做强度消弱(strength reduction)
思路3: 消除重复的计算
x = a + b
y = x
z = 2 * y
上面代码中,z 中的表达式 y 可以直接替换成 x,因为y的值就等于x。这个时候,可能x的值已经在寄存器中,所以直接采用x,运算速度会更快。这种优化叫做拷贝传播(Copy Propagation)。
值编号(Value Numbering)也能减少重复计算。值编号是把相同的值,在系统里给一个相同的编号,并且只计算一次即可。比如
w = 3
x = 3
y = x + 4
z = w + 4
w 和 x 的值相同,因此他们的编号相同,这又导致 y 和 z 的编号相同,那么加法计算只需要计算一次即可。
还有一种优化方法叫做公共子表达式消除(Common Subexpression Elimination,CSE),也会减少计算次数。下面这两行代码,x和y右边的形式是一样的,如果这两行代码之间,a和b的值没有发生变化(比如采用SSA形式),那么x和y的值一定是一样的。
x = a + b
y = a + b
那我们就可以让y等于x,从而减少了一次对“a+b”的计算,这就是公共子表达式消除。
思路4: 针对循环的优化
第一种:归纳变量优化(Induction Variable Optimization)。
看下面这个循环,其中的变量j是由循环变量派生出来的,这种变量叫做该循环的归纳变量。归纳变量的变化是很有规律的,因此可以尝试做强度折减优化。示例代码中的乘法可以由加法替代。
int j = 0;
for (int i = 1; i < 100; i++) {
    j = 2*i;  //2*i可以替换成j+2
}
return j;
第二种:边界检查消除(Unnecessary Bounds-checking Elimination)。
当引用一个数组成员的时候,通常要检查下标是否越界。在循环里面,如果每次都要检查的话,代价就会相当高(例如做多个数组的向量运算的时候)。如果编译器能够确定,在循环中使用的数组下标(通常是循环变量或者基于循环变量的归纳变量)不会越界,那就可以消除掉边界检查的代码,从而大大提高性能。
第三种:循环展开(Loop Unrolling)。
把循环次数减少,但在每一次循环里,完成原来多次循环的工作量。比如:
for (int i = 0; i< 100; i++){
  sum = sum + i;
}
优化后可以变成:
for (int i = 0; i< 100; i+=5){
  sum = sum + i;
  sum = sum + i + 1;
  sum = sum + i + 2;
  sum = sum + i + 3;
  sum = sum + i + 4;
}
进一步,循环体内的5条语句就可以优化成1条语句:sum = sum + i*5 + 10;。
减少循环次数,本身就能减少循环条件的执行次数。同时,它还会增加一个基本块中的指令数量,从而为指令排序的优化算法创造机会。
第四种:循环向量化(Loop Vectorization)。
在循环展开的基础上,我们有机会把多次计算优化成一个向量计算。比如,如果要循环16万次,对一个包含了16万个整数的数组做汇总,就可以变成循环1万次,每次用向量化的指令计算16个整数。
第五种:重组(Reassociation)。
在循环结构中,使用代数简化和重组,能获得更大的收益。比如,如下对数组的循环操作,其中数组 a[i,j] 的地址是a+i*N+j。但这个运算每次循环就要计算一次,一共要计算 M*N 次。但其实,这个地址表达式的前半截a+i*N不需要每次都在内循环里计算,只要在外循环计算就行了。
for (i = 0; i< M; i++){
  for (j = 0; j<N; j++){
    a[i,j] = b + a[i,j];
  }
}
优化后的代码相当于:
for (i = 0; i< M; i++){
  t=a+i*N;
  for (j = 0; j<N; j++){
    *(t+j) = b + *(t+j);
  }
}
第六种:循环不变代码外提(Loop-Invariant Code Motion,LICM)。
在循环结构中,如果发现有些代码其实跟循环无关,那就应该提到循环外面去,避免一次次重复计算。
以上这些优化方法,在 AI 编译器的表达式部分,也会经常使用到,尤其是针对循环的优化,因为深度学习模型本身就是计算密集型的,包含大量的张量和循环计算。
1.3 后端
前面说到,按照层次划分,可以将 IR 分为 HIR,MIR 和 LIR,而跟后端相关的自然就是 LIR 了,这部分的优化与目标硬件相关。编译器的后端功能,就是能够针对不同的计算机硬件,生成优化的代码。主要需要考虑以下三点
- 指令的选择 instruction selection
- 寄存器的分配 register allocation
- 指令的重排 instruction reorder
指令的选择
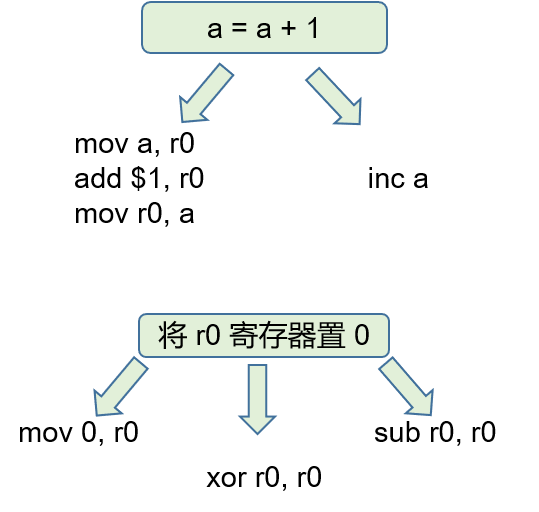
我们在使用 gcc 或者 llvm 编译器时,通常会使用各种优化等级。同一段代码,不使用优化和使用 O1 级别的优化,生成的代码是不相同的,性能也不同。也就是说,对于一个 CPU 来说,完成同样的任务可以采用多种不同的指令集合,而每种方式对应的生成的代码,以及代码的性能都是不相同,这也是为什么需要选择合适的指令的原因。指令选择的方法,通常是在 LIR 的基础上进行树覆盖的算法进行的。
寄存器分配
在 MIR 中做优化时,使用的寄存器是一种抽象意义上的寄存器,有无限多个(因为 MIR 是机器无关的)。但是目标硬件的寄存器数量总是有限的,在 LIR 中做寄存器分配时,就需要解决这个问题,如何最大程度的利用寄存器,且不超过寄存器总数的限制。
在数据流分析中,经常使用到的一种优化分析方法叫做变量活跃度分析(variable liveness)。就是说在程序的某一个点,计算出所有活跃变量和非活跃变量的集合,针对不活跃的变量,就可以复用它们的内存或者寄存器。
寄存器分配算法通常使用的是图染色算法,这种算法常见于 AOT 编译器中,还有一种线性分配算法,一般在解释器或者 JIT 编译器中使用。
指令重排
通用 CPU 中的指令采用的是流水线的执行方式,而一条指令的执行会用到多个功能部件,分成多个阶段,以典型的 RISC 指令为例,执行过程一般分为五个步骤
- 取值 IF/instruction fetch
- 译码 ID/instruction decode
- 执行 EX
- 访存 ME
- 写回 WB/write back
在同一时刻,不同的功能单元可以服务于不同的指令。
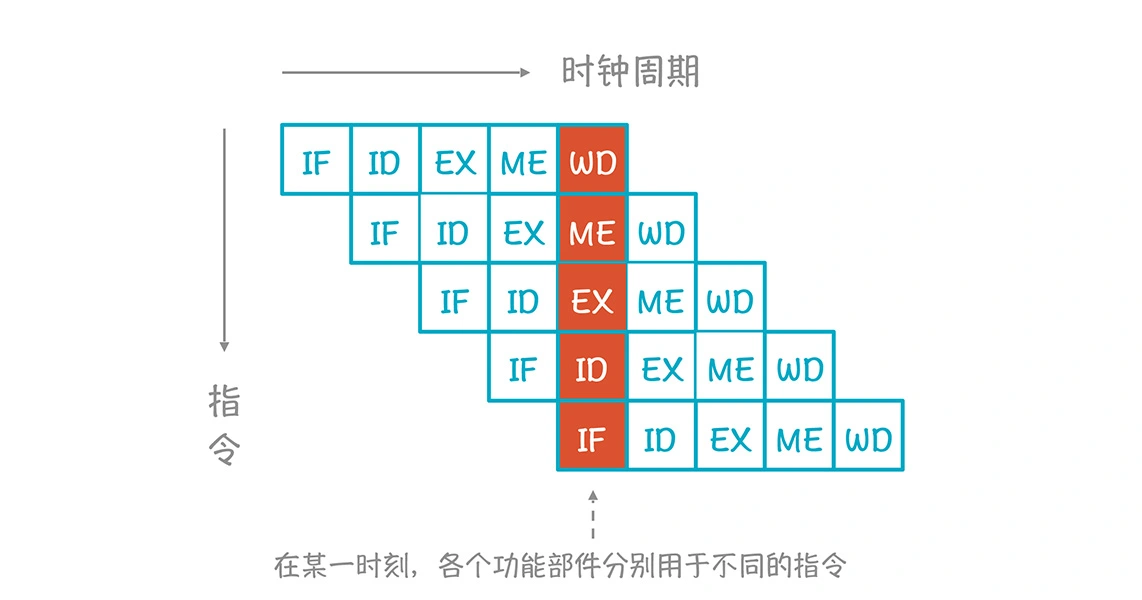
这样的话,多条指令实质上是并行执行的,从而减少了总的执行时间,这种并行叫做指令级并行。
那么,对指令进行分析,按照他们之间的数据依赖关系,构建一张指令数据依赖图,将图中没有数据依赖关系的指令拿出来,可以并行执行。这些指令结束时,从依赖图中删除,然后再选出没有依赖关系的指令继续并行执行,从而加快执行速度。
1.4 总结
我们分三个部分,从前端,中端和后端三个方面介绍了传统编译器,并介绍了一些编译器中常见的优化方法。同时,介绍了编译器后端部分主要考虑的三个方面。
也就说,如果基于 llvm 增加一个新的后端,就需要重新实现后端指令选择,寄存器分配,指令重排这些后端代码生成和优化的功能。
Part Two:深度学习编译器
2.1 为什么需要 DL Compiler
深度学习编译器以深度学习框架训练出的模型作为输入,对模型进行优化和编译,输出能够在特定硬件比如 CPU,GPU或者加速器上执行的二进制文件或者库。
随着AI的不断发展,涌现了很多AI框架。

相对的国内也有不少优秀的DL框架,比如
- 华为的 MindSpore
- 百度的 PaddlePaddle
- 旷视的 MegEngine
从推理框架角度来看,无论我们选择何种训练框架训练模型,我们最终都是要将训练好的模型部署到实际场景的。现在主流的深度学习训练框架比如 PyTorch/TensorFlow/MxNet/CNTK 等,对 CPU/CUDA 支持得很好,但是针对 Arm CPU/Arm GPU/FPGA/NPU(华为海思)/BPU(地平线)/MLU(寒武纪)等这些设备,手写一个用于推理的框架在所有可能部署的设备上都达到良好的性能并且易于使用是一件非常困难的事。
而现在Deep Learning有这么多不同前端(framework),有这么多不同的后端(hardware),是否能找到一个桥梁更有效实现他们之间的优化和映射呢?
这种情况跟传统编译器最开始遇到的问题非常相似。传统编译器,抽象出了前端,中端和后端的概念,来解决不同语言,不同硬件之间转换的问题,以 llvm 为例
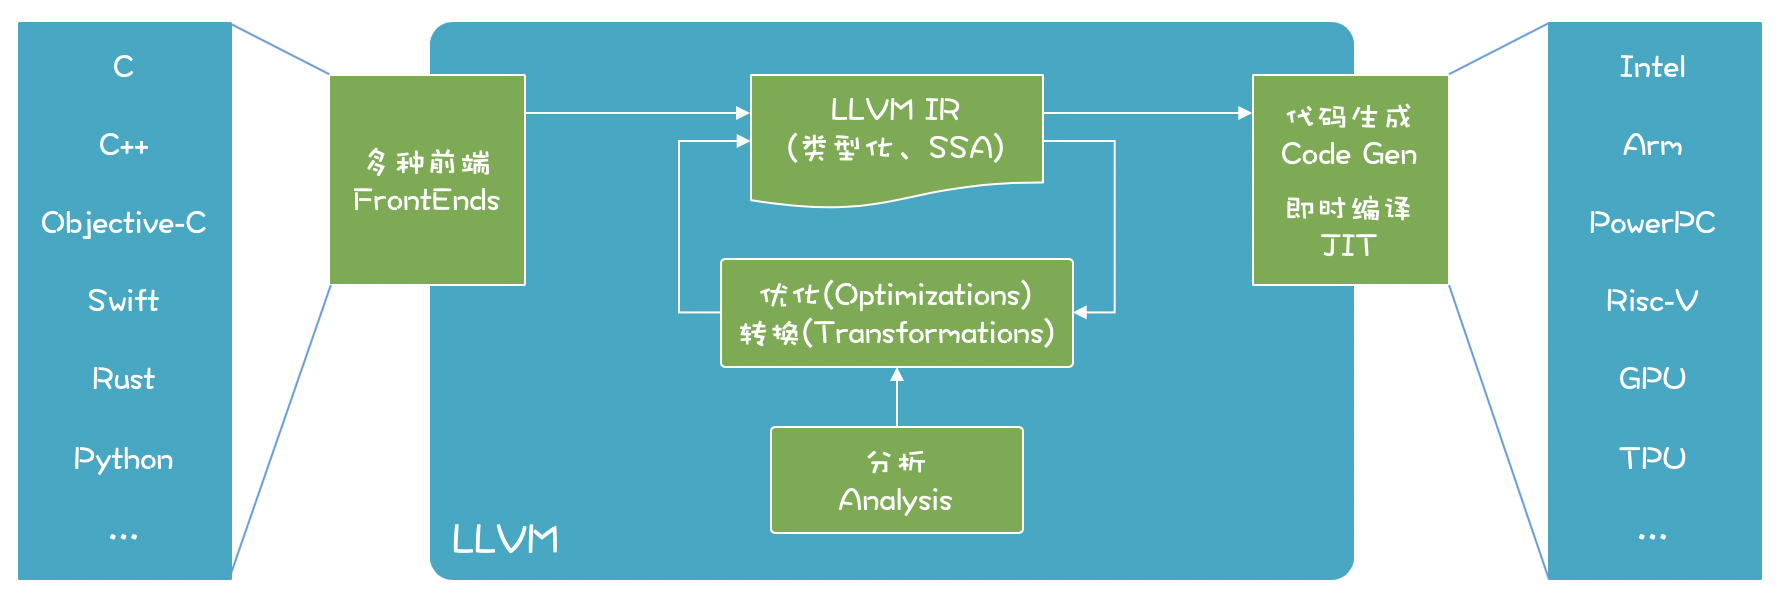
换句话说,这也正是重演了LLVM 出现时的场景:大量不同的编程语言和越来越多的硬件架构之间需要一个桥梁。LLVM 的出现,让不同的前端后端使用统一的 LLVM IR ,如果需要支持新的编程语言或者新的设备平台,只需要开发对应的前端和后端即可。
受此启发,我们可以将 DL 框架训练出来的深度模型看成是各种编程语言,作为深度学习编译器的输入,转换成图IR后,经过图优化和转换,生成针对特定目标硬件/加速器的代码。
2.2 DL Compiler 的通用架构设计
跟传统编译器类似,DL 编译器也分成前端和后端两个维度。DL模型在DL编译器中被转换成多级IR,其中高级IR位于前端,低级IR位于后端。基于高级IR,编译器前端负责硬件无关的转换和优化。基于低级IR,编译器后端负责特定于硬件的优化、代码生成和编译。
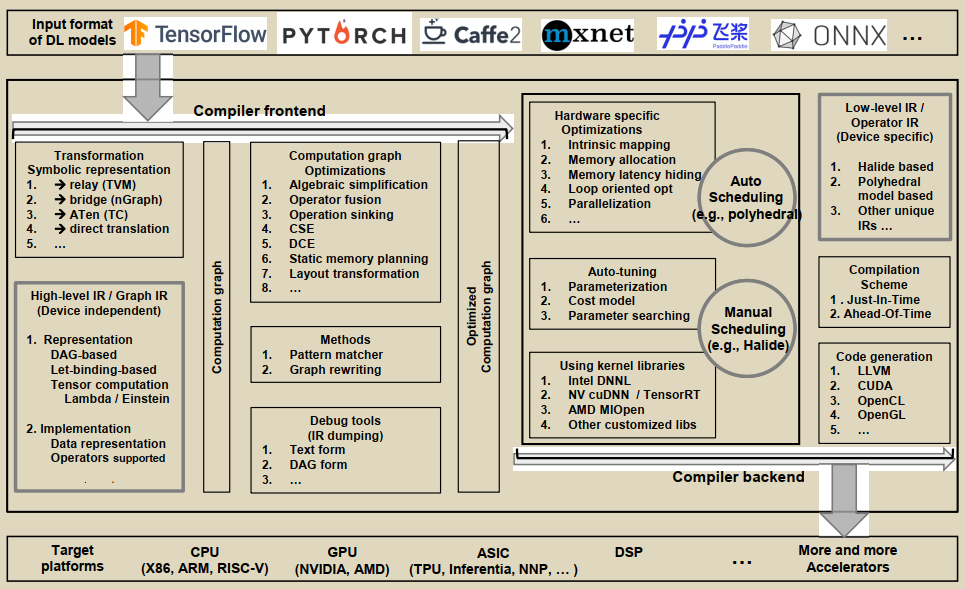
前端
前端将 DL model 转换成 Graph IR,即 High-IR,这部分是对计算和控制流的高度抽象,将多种模型都转换成同一种 IR 结构,与目标硬件无关。前端优化也就是计算图优化,是与机器无关的优化,可以分为三个维度
计算图的优化,可以分为三个维度:
- node-level
- Nop Elimination 删除没有操作的指令的节点,也就是冗余代码消除
- Zero-dim-tensor Elimination 删除输入是 zero-dim tensor 的操作
- block-level
- Algebraic simplification 代数化简,化简后可以做常量折叠,同时可以将某些算子用低代价的算子进行替换
- Operator fusion
- dataflow-level
- Common Subexpression Elimination 通用表达式消除,避免同样的表达式多次计算
- Dead Code Elimination
- Static memory planning
- Layout transformation 找出计算图中存储张量的最佳数据布局
后端
后端将 HIR 转换成 LIR,并做很多针对目标硬件的优化工作。一方面,它可以直接将高级IR转换为第三方工具链(如LLVM IR),以利用现有的基础设施进行通用优化和代码生成。另一方面,它可以利用DL模型和硬件特性,定制编译过程来更高效地生成代码。
后端优化针对特定硬件,与机器相关。
- memory allocation and fetch
-
memory latency hiding,原理与传统编译器中指令重排算法相同
- loop oriented optimization
- loop fusion
- sliding Windows
- tiling
- loop reordering
- loop unrolling
- parallelization 多线程和SIMD
- auto-tunning 为程序生成一个优化的schedule的搜索空间,使用机器学习算法,在搜索空间中选择最优优化策略,当前有两种,一种是polyhedral 算法,一种是 tvm 中的 ansor ,auto schdule
2.3 主流深度学习编译框架对比
当前主流的DL编译器,有 apache TVM,Intel 的 nGraph,Facebook 的 TC (Tensor Comprehension) 和 Glow,以及 Google 的 XLA,下图引用自 The Deep Learning Compiler: A Comprehensive Survey
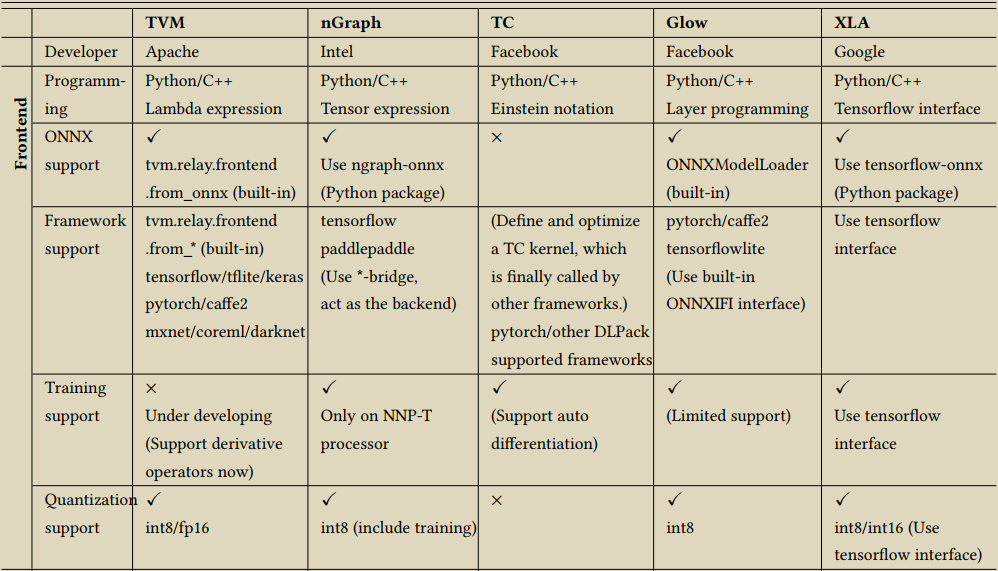
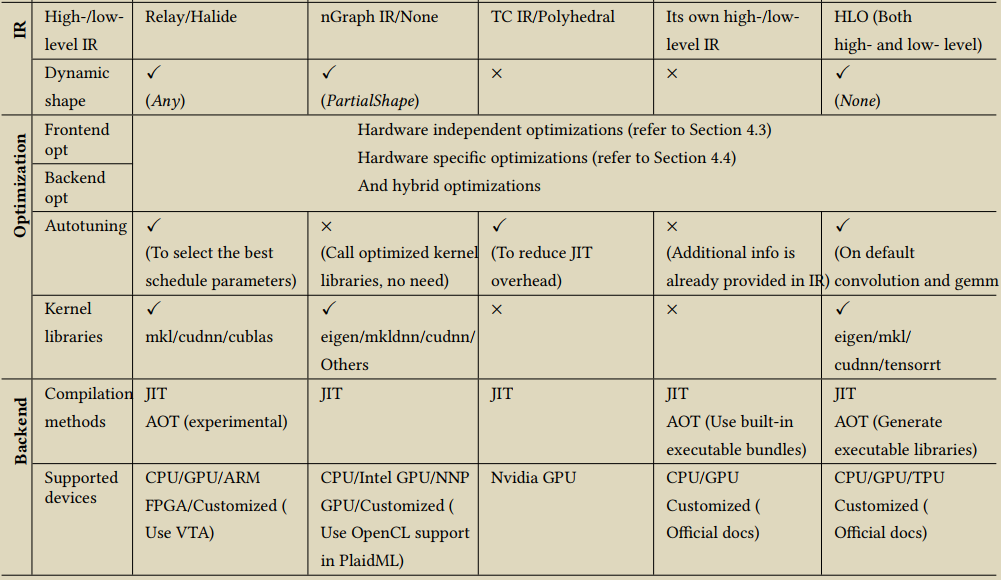
相对来说,开源的 TVM 是最早在工业界完成技术验证的,其所支持的功能和社区活跃度都是处于前列的。
2.4 传统编译器 vs DL 编译器
-
侧重点不同。
传统编译器注重于优化寄存器使用和指令集匹配,其优化往往偏向于局部。而深度学习编译器的优化往往需要涉及到全局的改写,包括之前提到的内存,算子融合等。目前深度学习框架的图优化或者高层优化(HLO)部分和传统编译的pass比较匹配,这些优化也会逐渐被标准的pass所替代。
理解:传统编译器中的优化,在函数内有局部优化和全局优化,而在函数间叫做 inter procedural optimization。在函数内,局部优化,更多的是针对表达式,basic block 内的优化,而全局优化是在 basic block 间的优化,有数据流分析,控制流分析等。这种就跟深度学习编译器很类似,将整个模型看作是一个function的话,在整个function上探索最佳的优化策略。
-
自动代码生成上,传统编译器的目标是生成比较优化的通用代码。比如 gcc 中经常使用的 O1,O2,O3 等优化选项,每一种不同的优化级别对应不同的优化选项,经过优化和生成的代码是性能较好的通用代码,而没有专门指定某些优化策略可以达到更好的性能。
而深度学习编译器的目标是生成接近手写或者更加高效的特定代码(卷积,矩阵乘法等)。相对的,在一些情况下深度学习编译器可以花费更多的时间去寻找这些解决方案。
-
优化思路上。传统编译器采用的是启发式算法,从前端,到中端,到后端不停的优化和lower,生成目标代码的过程。而 DL 编译器,再最终生成代码前,会使用 auto tuning 的技术,使用机器学习的思路,再搜索空间内寻找最佳的优化配置进行优化。
2.5 深度学习研究热点和前沿方向
-
动态模型的支持
动态模型是指输入形状可能在执行过程中发生变化。特别是在NLP领域,模型可以接受各种形状的输入,这对DL编译器来说是一个挑战,因为数据的形状直到运行时才是已知的。tvm 中采用了nimble的设计思路,引入了新的类型系统,shape function和各种用于优化和代码生成的原语,同时为了支持移植性问题,引入了虚拟机进行处理。
- arXiv:2019,Relay: A High-Level Compiler for Deep Learning.
- Glow: Graph Lowering Compiler Techniques for Neural Networks.
- 2018, Dynamic Control Flow in Large-Scale Machine Learning
- arXiv:2021,The CoRa Tensor Compiler: Compilation for Ragged Tensors with Minimal Padding
- arXiv:2021,Nimble: Efficiently Compiling Dynamic Neural Networks for Model Inference
- DISC: A Dynamic Shape Compiler for Machine Learning Workloads
- Cortex: A Compiler for Recursive Deep Learning Models
-
高级自动调整
现有的自动调谐技术集中在单个运算符的优化上。然而,局部优化的组合并不能导致全局优化。例如,两个相邻的运算符适用于不同的数据布局,可以一起进行调整,而不需要在两者之间引入额外的内存转换。此外,随着边缘计算的兴起,执行时间不仅是DL编译器的优化目标,在自动调整中也应考虑新的优化目标,如内存占用和能源消耗。而自动调整技术,通过构建优化的schedule搜索空间,利用机器学习算法,在搜索空间内搜索最佳的优化配置,目前主要有两种方案,一种是polyhedral算法,一种是ansor的方式。
在 TVM 中,最开始的版本使用的是一种基于模板的 Auto TVM 的方案,需要手动编写优化的模板,模板中的 placeholder 表示需要调整的参数,但是这种做法最终的性能与所编写的模板有很大关联,使用的难度比较高。在最新的版本中,实现了 ansor 的方案,自动构建搜索空间,自动搜索最佳配置。
- A Survey on Compiler Autotuning using Machine Learning
- David E. Goldberg. 1989. Genetic Algorithms in Search, Optimization and Machine Learning (1st ed.). Addison-Wesley Longman Publishing Co., Inc., USA
- Samuel Kaufman, Phitchaya Mangpo Phothilimthana, and Mike Burrows. 2019. Learned TPU Cost Model for XLA Tensor Programs. In Proceedings of the Workshop on ML for Systems at NeurIPS 2019. Curran Associates, Vancouver, Canada, 1–6
- OSDI,2020,Ansor: Generating High-Performance Tensor Programs for Deep Learning
- A Full-Stack Search Technique for Domain Optimized Deep Learning Accelerators
- FlexTensor: An Automatic Schedule Exploration and Optimization Framework for Tensor Computation on Heterogeneous System
- ProTuner: Tuning Programs with Monte Carlo Tree Search
- A Sparse Iteration Space Transformation Framework for Sparse Tensor Algebra
- Optimizing the Memory Hierarchy by Compositing Automatic Transformations on Computations and Data
- COBAYN: Compiler autotuning framework using bayesian networks
- Automatic Tuning of Compilers Using Machine Learning
- Design Space Exploration of Compiler Passes: A Co-Exploration Approach for the Embedded Domain
- 2017, SCOPES, Stencil autotuning with ordinal regression: Extended abstract
- Autotuning algorithmic choice for input sensitivity, 2015
- 2018, A collective knowledge workflow for collaborative research into multi-objective autotuning and machine learning techniques
- Automating compiler-directed autotuning for phased performance behavior
-
polyhedral model
将多面体模型和自动调谐技术结合起来,以提高DL编译器的效率,是一个很有前途的研究方向。一方面,自动调谐可以通过重复使用以前的配置来减少多面体JIT编译的开销。另一方面,多面体模型可以被用来进行自动调度,这可以减少自动调谐的搜索空间。在DL编译器中应用多面体模型的另一个挑战是如何支持稀疏张量。
-
Roberto Bagnara, Patricia M Hill, and Enea Zaffanella. 2006. The Parma Polyhedra Library: Toward a complete set of numerical abstractions for the analysis and verification of hardware and software systems.
-
Chun Chen. 2012. Polyhedra scanning revisited. In Proceedings of the 33rd ACM SIGPLAN conference on Programming Language Design and Implementation. ACM, Beijing, China, 499–508
-
Tobias Grosser. 2000. Polyhedral Compilation. https://polyhedral.info. Accessed February 4, 2020
- Vincent Loechner. 1999. PolyLib: A library for manipulating parameterized polyhedra. https://repo.or.cz/polylib.git/blob_plain/HEAD:/doc/parampoly-doc.ps.gz
- 2006, Polyhedral code generation in the real world
- 2015, Tensor-matrix products with a compressed sparse tensor
- 2015, Loop and Data Transformations for Sparse Matrix Code
- 2010, isl: An integer set library for the polyhedral model
- 2013, Polyhedral parallel code generation for CUDA
- 2008, PLDI, A practical automatic polyhedral parallelizer and locality optimizer
-
-
Subgraph partitioning
支持子图划分的DL编译器可以将计算图划分为若干个子图,并以不同的方式处理这些子图。子图划分为DL编译器提供了更多的研究机会。首先,它为整合图库进行优化提供了可能性。其次,它为异构和并行执行提供了可能。一旦计算图被分割成子图,不同子图的执行就可以分配给不同硬件目标。
子图划分神经网络的特性优化,神经网络结构是一种层次结构关系,前后layer之间是一种输入输出的数据依赖关系,这也是能够对计算图进行分层划分的一个原因。
relay 中就对计算图进行了划分,然后对子图进行处理后转化成 tensor expression 进行调度处理。
- Tvm: an automated end-to-end optimizing compiler for deep learning
- Relay: a highlevel compiler for deep learning.
-
Unified optimizations
尽管现有的 DL 编译器在计算图优化和特定硬件优化方面都采用了类似的设计,但每个编译器都有自己的优势。目前,谷歌 MLIR 是朝着这个方向的一个很有希望的举措。它提供了多级IRs的基础设施,并包含IR规范和工具包,以便在每个级别的IRs之间进行转换。它还提供了灵活的方言,因此每个DL编译器都可以为高层和低层构建自己的方言。通过跨方言的转换。一个DL编译器的优化可以被另一个编译器重新使用。MLIR 可以理解成是一个编译器的编译器,IREE 就是对这个目标的一个尝试,它将 DL 模型转化成统一的 IR,以满足移动和边缘部署的特殊限制。
Chris Lattner, Mehdi Amini, Uday Bondhugula, Albert Cohen, Andy Davis, Jacques Pienaar, River Riddle, Tatiana Shpeisman, Nicolas Vasilache, and Oleksandr Zinenko. 2020. MLIR: A Compiler Infrastructure for the End of Moore’s Law. arXiv:cs.PL/2002.11054
-
Privacy protection – 这属于未来研究方向 ,不是研究热点
在边缘-云系统中,DL 模型通常被分成两部分,分别在边缘设备和云服务上运行,这可以提供更好的响应延迟和减少通信带宽。然而,用户隐私的保护是边缘-云系统需要解决的一个问题之一。攻击者通过截获边缘设备发送到云端的中间结果,然后使用这些中间结果来训练一个可以暴露隐私信息的模型。为了保护边缘云系统的隐私,最新研究提出了一种端到端的框架Shredder,在不改变预训练网络的拓扑结构或权重的情况下,通过在中间结果中加入具有特殊统计特性的噪声,减少通信数据的信息内容,同时保持推理准确性,这样可以降低攻击者任务的准确性。
然而,困难在于要确定插入噪声的层,这需要大量的人力来确定最佳层。编译器保持着DL模型的丰富信息,如果通过编译器自动指导各层的噪声插入,那将是极为方便的。
这里可以这么理解,程序分析领域,经常有需要对程序进行加壳和模糊化的处理,其实就是对原有程序进行转换,使得逆向反汇编出来的代码难以阅读,尽量去阻止他人从二进制文件中获取有用的信息。同理,通过编译器在网络层中插入噪音,使得攻击者很难从中间结果中获取到有用的信息,当获取信息的成本大于收益时,做的人自然就少了。
- Ruiyuan Gao, Ming Dun, Hailong Yang, Zhongzhi Luan, and Depei Qian. 2019. Privacy for Rescue: A New Testimony Why Privacy is Vulnerable In Deep Models
- 2020, Shredder: Learning noise distributions to protect inference privacy.
- Seyed Ali Osia, Ali Taheri, Ali Shahin Shamsabadi, Kleomenis Katevas, Hamed Haddadi, and Hamid R Rabiee. 2018. Deep private-feature extraction. IEEE Transactions on Knowledge and Data Engineering 32, 1 (2018), 54–66
2.6 我对深度学习编译器的理解
我们经常使用的编程语言翻译到目标代码,通常要经过编译,汇编,连接的过程。而深度学习模型翻译到目标代码是怎么来理解呢?

下图是一个典型的卷积神经网络的抽象结构图

卷积,激活,池化,全连接这些操作,都是一个个的张量计算过程,重点就是数据的计算。而卷积神经网络的另一个特征,就是数据之间的层次关系。前一层的计算结果作为下一层的输入,层与层之间存在着一种输入输出的数据依赖关系。
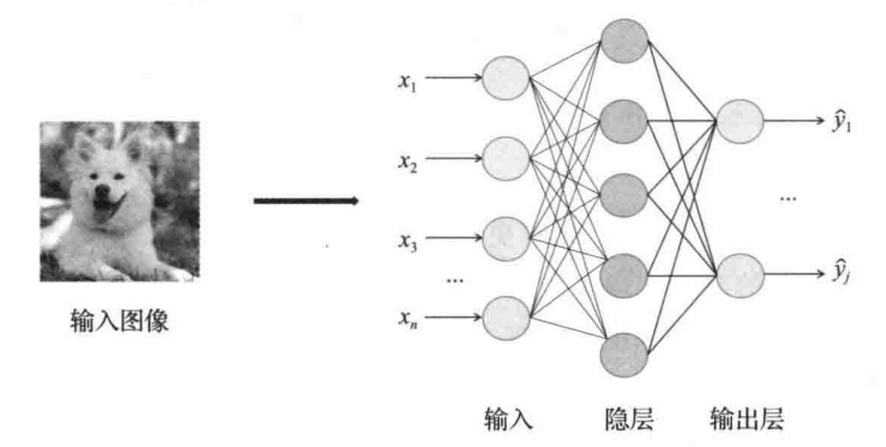
在深度学习框架或者深度学习编译器中,通常会将模型转换成计算图,而计算图也反映了这种数据流的依赖关系。在 tvm 中会将计算图切分成子图,没有数据依赖关系的子图可以并行执行,有数据依赖关系的子图顺序执行。relay 中更进一步,将子图转换成 tensor expression。这一步让人非常愉悦,因为成了表达式,我们前面介绍的传统编译器里面的那么多的对表达式的优化方法,就都可以使用上了。
对 tensor expression 进行各种优化,每一种优化对应的最终生成的目标代码都会有所差异。这里跟之前介绍的指令选择时的道理是类似的。在 auto tuning 中,每一个 tensor expression,都会有很多种不同的优化方式的集合,这些就称之为 schedule,这些构成了一个搜索空间,在这个搜索空间中搜索出一个最佳的优化方案,就确定了最终该 expression 的代码生成,也就是说找到一个 tensor expression + schedule 的组合。
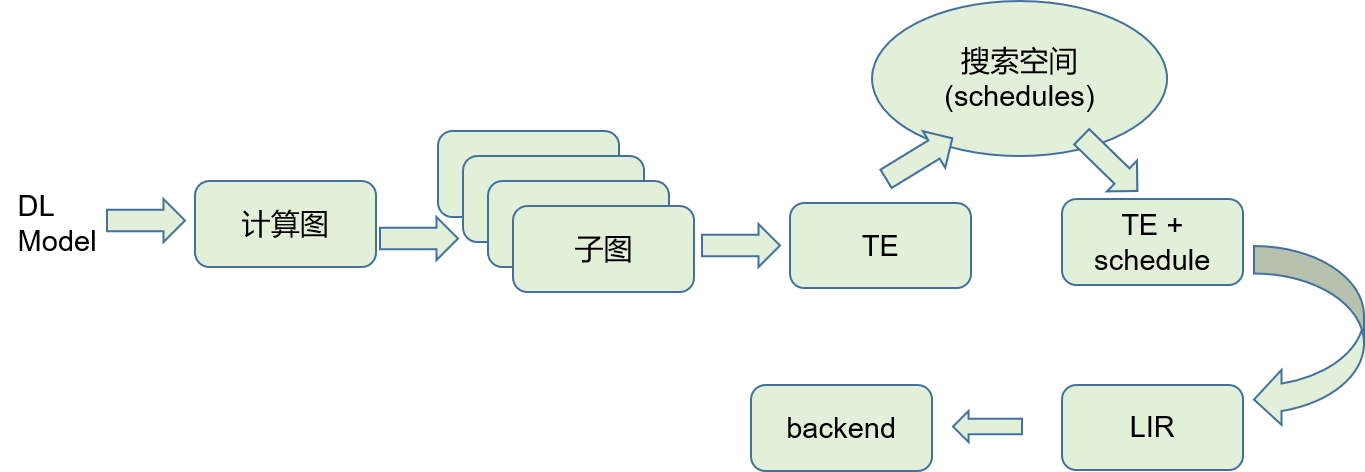
最终,一个 dl 模型翻译成的一个 IR 结果,就是一个 function,有输入和输出,函数体就是一个个表达式的计算。我们可以看下 tvm 生成的一个 IR 表示
def @main(%data: Tensor[(1, 3, 224, 224), float32], %bn_data_gamma: Tensor[(3), float32], %bn_data_beta: Tensor[(3), float32], %bn_data_moving_mean: Tensor[(3), float32], %bn_data_moving_var: Tensor[(3), float32], %conv0_weight: Tensor[(64, 3, 7, 7), float32], %bn0_gamma: Tensor[(64), float32], %bn0_beta: Tensor[(64), float32],...)
  %1 = %0.0;
  %2 = nn.conv2d(%1, %conv0_weight, strides=[2, 2], padding=[3, 3, 3, 3], channels=64, kernel_size=[7, 7]) /* ty=Tensor[(1, 64, 112, 112), float32] */;
  %3 = nn.batch_norm(%2, %bn0_gamma, %bn0_beta, %bn0_moving_mean, %bn0_moving_var, epsilon=2e-05f) /* ty=(Tensor[(1, 64, 112, 112), float32], Tensor[(64), float32], Tensor[(64), float32]) */;
  %4 = %3.0;
  %5 = nn.relu(%4) /* ty=Tensor[(1, 64, 112, 112), float32] */;
  ...
这个结构,与我们前面介绍的 SSA 非常相似,其实就是生成的一个基于 SSA 的中间表示结果 IR。我们可以看下 llvm ir 的样子,
define i32 @fun1(i32, i32) #0 {
  %3 = alloca i32, align 4
  %4 = alloca i32, align 4
  %5 = alloca i32, align 4
  store i32 %0, i32* %3, align 4
  store i32 %1, i32* %4, align 4
  store i32 10, i32* %5, align 4
  %6 = load i32, i32* %3, align 4
  %7 = load i32, i32* %4, align 4
  %8 = add nsw i32 %6, %7
  %9 = load i32, i32* %5, align 4
  %10 = add nsw i32 %8, %9
  ret i32 %10
}
上面这个 llvm ir 片段是对
int fun1(int a, int b){
    int c = 10;
    return a+b+c;
}
这个代码片段编译生成出来的 IR,可以看到 tvm ir 和 llvm ir 非常相似,而 llvm ir 更接近汇编代码,但是 ir 比汇编代码能表达的更多,无论是 tvm ir 还是 llvm ir 都是保留了类型信息的。
总结:对 DL 模型来说,本质上就是一系列的数学计算,通过将这些数学计算抽象成表达式的形式,可以使用很多编译器中的优化算法对这些表达式进行优化,同时,将整个模型看成是一个有输入参数和输出的函数,就可以理解为什么可以使用编译的方式对 DL 模型进行处理了。比如我们在做算法题时,也是将数学问题抽象,用计算机高级编程语言的形式进行表达,说白了就是对数学问题进行抽象后,用计算机编程语言的方式来表示对这个抽象问题的计算过程,得到一个预期的输出结果,而这个计算过程的表达,我们在这里可以理解成两种形式,一种使用高级编程语言,一种使用 DL 模型。
同时,既然是编译器,那么首先需要保证编译后的模型的输入和输出保持原有的期望不变,也就是说,DL 编译器只是将模型翻译成了更加适合在特定硬件上运行的二进制程序,而不会改变模型推理的结果。
2.7 Idea
在 DL 编译器中,auto tuning 技术,是在搜索空间中找到 tensor expression + schedule 的最佳组合,生成最佳优化的代码,而对整个模型来说,可以理解成是在整个 function 内不断搜索最佳优化配置的过程。
如果在传统编译器中,针对每一个function,直接使用 auto tuning,时间成本太大。那么,在 JIT 编译器中,通过对运行时收集的 hot spot 的代码片段,以 function 为单位进行编译时,是不是可以使用这种方式来优化呢。
JIT 在运行时,会收集程序运行时的信息,同时分析出热点代码,将热点代码翻译成二进制的形式提高运行速度。在 JIT 编译时,同时使用 auto tuning 的方式在搜索空间中选择一个最佳的优化方案,与原有 JIT 的二进制结果进行性能对比,如果更优,就直接替换原有的二进制代码。

NOTE: 相较于传统 JIT 编译器来说,没有进行过多激进式的优化方式,可能主要是考虑到优化过程的耗时问题。也就是说,为了在更短的时间内,生成更加有效的代码,取代原先解释执行的方式,以提高执行的速度。在DL编译器中所使用的这种 auto tuning 的思想,是为了解决在特定硬件平台上找到最佳优化的问题,这种方式可能不会计较时间成本,且愿意花费比较长的时间去找到一个最佳的优化策略。那么可以这么来想一下,现在 JIT 编译器都是启发式的算法来进行的优化,而机器学习的方式也许能找到一个更好的优化策略,在启发式算法和机器学习的优化中进行对比,能否可以找到一个更加的优化方式,来提升启发式算法的性能。或者说在预训练模型的基础上,直接就能找到一个更好的优化策略,直接取代启发式优化算法。
Part Three: TVM
TVM是一个端到端的深度学习工具链,能够高效地把前端深度学习模型部署到CPUs、GPUs和专用的加速器上。TVM具有强大的兼容能力和扩展性,支持主流的深度学习前端框架,包括TensorFlow, MXNet, PyTorch, Keras, CNTK;同时能够部署到宽泛的硬件后端,包括CPUs, server GPUs, mobile GPUs, and FPGA-based accelerators。
cpu: i8250u, Kaby Lake R
3.1 tvm 环境搭建
step 1 - 下载
到官网下载 tvm source code。使用 git clone –recursive 的方式,总是在 3rdparty 的下载时出错,直接使用源代码下载的方式,可以将完整的代码都下载下来。
step 2 - 编译
将源代码文件进行解压缩。按照官方文档,设置 cmake 的参数
cd tvm
mkdir build
cp cmake/config.cmake build
cd build
编辑 config.cmake 文件。
-
如果有 GPU,将
set(USE_CUDA OFF)设置为set(USE_CUDA ON),如果需要支持其他的后端或者库,也是这种设置方法,比如 OpenCL, RCOM, METAL, VULKAN, … -
To help with debugging, ensure the embedded graph executor and debugging functions are enabled with
set(USE_GRAPH_EXECUTOR ON)andset(USE_PROFILER ON) -
To debug with IRs,
set(USE_RELAY_DEBUG ON)and set environment variable TVM_LOG_DEBUG.export TVM_LOG_DEBUG="ir/transform.cc=1;relay/ir/transform.cc=1"
tvm 编译器需要 llvm 的支持(因为后端输出的时候,是将结果转换成 LLVM IR,然后由 LLVM 来完成最终二进制文件的翻译的)。所以来的 LLVM要 4.0 以上的版本。在 config.cmake 中,打开 llvm 的开关 set(USE_LLVM ON),如果 llvm 环境不是默认安装的方式,可以指定 llvm 的配置路径,如下
set(USE_LLVM /path/to/your/llvm/bin/llvm-config)
如果本地安装有 pytorch,避免两个软件中依赖的 llvm 的版本冲突,改成如下
(USE_LLVM "/path/to/llvm-config --link-static")
使用静态链接的方式,而不是采用动态链接库的方式进行编译。
最终进行编译
cmake -DCMAKE_BUILD_TYPE=Debug .. # 打开 debug,也就是 -g 参数进行编译
make -j4
如果要使用 googletest 运行cpptest,需要打开 set(USE_GTEST ON),提前安装好 googletest 库。否则 make cpptest 会失败。该 test 开关默认是 AUTO 的状态,cmake 或使用 find_package 自动检测,如果没有找到 googletest 库,就设置为 OFF
cpptest 编译完成之后,直接运行,测试用例通过,说明tvm安装成功。
python 包的安装
tvm源码中,python 包的位置为 tvm/python,有两种方式安装 python 包。
method 1
适用于开发人员,通过指定环境变量的方式
export TVM_HOME=/path/to/tvm
export PYTHONPATH=$TVM_HOME/python:${PYTHONPATH}
method 2
使用 setup 的安装方式
export MACOSX_DEPLOYMENT_TARGET=10.9  # This is required for mac to avoid symbol conflicts with libstdc++
cd python
python setup.py install --user
cd ..
--user 的选项,如果是通过 virtualenv 或者 conda 的虚拟环境,就需要,如果是在本地全局环境中,且有 root 权限就不需要
必要的依赖:
pip3 install --user numpy decorator attrs
- 如果你想使用 RPC Tracker
pip3 install --user tornado
- 如果你想使用自动调整模块
pip3 install --user tornado psutil xgboost cloudpickle
模型编译
模型的编译优化,不改变深度模型的预测结果,而是提升特定硬件上该模型的运行性能和速度
完成以下任务
- 为 TVM 运行时编译预训练的 ResNet-50 v2 模型。
- 通过编译的模型运行真实图像,并解释输出和模型性能。
- 使用 TVM 在 CPU 上调整模型。
- 使用 TVM 收集的调整数据重新编译优化模型。
- 通过优化模型运行图像,并比较输出和模型性能
tvmc 是 tvm/python 的一个模块,上述安装好之后,可创建一个别名
alias tvmc="python -m tvm.driver.tvmc"
这样就能直接使用 tvmc 命令了
(pytorch) jona@jona-ThinkPad:~/myGit/compiler_study/tvm$ tvmc
usage: tvmc [-h] [-v] [--version] {tune,compile,run} ...

TVM compiler driver

optional arguments:
  -h, --help          show this help message and exit
  -v, --verbose       increase verbosity
  --version           print the version and exit

commands:
  {tune,compile,run}
    tune              auto-tune a model
    compile           compile a model.
    run               run a compiled module

TVMC - TVM driver command-line interface
tvmc 是 tvm 命令行接口,三个子命令分别是 tune,compiler 和 run,可以使用这个命令行的方式对机器学习模型进行编译和优化。
github onnx/models 仓库中下载 ONNX 格式的模型 resnet50-v2-7.onnx
tmvc 当前支持的格式,使用 tvmc compiler --help 查看 --model-format 选项的参数可知
--model-format {keras,onnx,pb,tflite,pytorch,paddle}
使用 tvmc compile 对 resnet50-v2-7.onnx 进行编译
tvmc compile --target "llvm" --output resnet50-v2-7-tvm.tar resnet50-v2-7.onnx
编译完成后,对编译结果进行解压缩
tar xvf resnet50-v2-7-tvm.tar
ls
可以看到如下三个文件
- mod.so 是模型,可以由TVM运行时加载的C++库。
- mod.json是TVM Relay计算图的文本表示。
- mod.params是一个包含预训练模型参数的文件。
运行编译好的模型
使用 tvm 的运行时运行模型,及 tvmc 的 run 子命令。要使用 TVMC 运行模型并进行预测,我们需要两件事:
- 我们刚刚生成的编译模块。
- 模型的有效输入以进行预测。
当涉及到预期的张量形状、格式和数据类型时,每个模型都是特殊的。出于这个原因,大多数模型都需要一些预处理和后处理,以确保输入有效并解释输出。TVMC.npz对输入和输出数据都采用了 NumPy 的格式。这是一种得到很好支持的 NumPy 格式,可以将多个数组序列化到一个文件中。
输入预处理
对于我们的 ResNet-50 v2 模型,输入应该是 ImageNet 格式。这是为 ResNet-50 v2 预处理图像的脚本示例。
#!python preprocess.py
from tvm.contrib.download import download_testdata
from PIL import Image
import numpy as np

img_url = "https://s3.amazonaws.com/model-server/inputs/kitten.jpg"
img_path = download_testdata(img_url, "imagenet_cat.png", module="data")

### Resize it to 224x224
resized_image = Image.open(img_path).resize((224, 224))
img_data = np.asarray(resized_image).astype("float32")

### ONNX expects NCHW input, so convert the array
img_data = np.transpose(img_data, (2, 0, 1))

### Normalize according to ImageNet
imagenet_mean = np.array([0.485, 0.456, 0.406])
imagenet_stddev = np.array([0.229, 0.224, 0.225])
norm_img_data = np.zeros(img_data.shape).astype("float32")
for i in range(img_data.shape[0]):
      norm_img_data[i, :, :] = (img_data[i, :, :] / 255 - imagenet_mean[i]) / imagenet_stddev[i]

### Add batch dimension
img_data = np.expand_dims(norm_img_data, axis=0)

### Save to .npz (outputs imagenet_cat.npz)
np.savez("imagenet_cat", data=img_data)
运行编译模块
有了模型和输入数据,我们现在可以运行 TVMC 进行预测:
tvmc run \
--inputs imagenet_cat.npz \
--output predictions.npz \
resnet50-v2-7-tvm.tar
回想一下,.tar模型文件包括一个 C++ 库、对 Relay 模型的描述以及模型的参数。TVMC 包括 TVM 运行时,它可以加载模型并对输入进行预测。运行上述命令时,TVMC 会输出一个新文件 ,predictions.npz其中包含 NumPy 格式的模型输出张量。
输出后处理
对输出后的预测结果进行处理,输出成可读(human readable format)的形式
#!python ./postprocess.py
import os.path
import numpy as np

from scipy.special import softmax

from tvm.contrib.download import download_testdata

### Download a list of labels
labels_url = "https://s3.amazonaws.com/onnx-model-zoo/synset.txt"
labels_path = download_testdata(labels_url, "synset.txt", module="data")

with open(labels_path, "r") as f:
    labels = [l.rstrip() for l in f]

output_file = "predictions.npz"

### Open the output and read the output tensor
if os.path.exists(output_file):
    with np.load(output_file) as data:
        scores = softmax(data["output_0"])
        scores = np.squeeze(scores)
        ranks = np.argsort(scores)[::-1]

        for rank in ranks[0:5]:
            print("class='%s' with probability=%f" % (labels[rank], scores[rank]))
结果如下所示

自动调整 ResNet 模型
TVM 中的调优是指优化模型以在给定目标上运行得更快的过程。这与训练或微调不同,它不会影响模型的准确性,而只会影响运行时性能。作为调整过程的一部分,TVM 将尝试运行许多不同的算子实现变体,以查看哪些执行得最好。这些运行的结果存储在调整记录文件中,该文件最终是tune子命令的输出。
In the simplest form, tuning requires you to provide three things:
- the target specification of the device you intend to run this model on
- the path to an output file in which the tuning records will be stored, and finally
- a path to the model to be tuned.
tvmc tune --target "llvm" --output resnet50-v2-7-autotuner_records.json resnet50-v2-7.onnx
TVMC 将针对模型的参数空间执行搜索,为operator尝试不同的配置并选择在当前平台上运行最快的配置
使用调整数据编译优化模型
作为上述调优过程的输出,我们获得了存储在 中的调优记录resnet50-v2-7-autotuner_records.json。该文件可以通过两种方式使用:
- 作为进一步调整的输入。
tvmc tune --tuning-records - 作为编译器的输入
编译器将使用结果为指定目标上的模型生成高性能代码
tvmc compile --target "llvm" --tuning-records resnet50-v2-7-autotuner_records.json --output resnet50-v2-7-tvm_autotuned.tar resnet50-v2-7.onnx
验证优化模型是否运行并产生相同的结果:
tvmc run \
--inputs imagenet_cat.npz \
--output predictions.npz \
resnet50-v2-7-tvm_autotuned.tar

python postprocess.py
性能分析对比
$ tvmc  run --inputs imagenet_cat.npz --output predictions.npz --print-time --repeat 100 resnet50-v2-7-tvm_autotuned.tar
Execution time summary:
 mean (ms)   median (ms)    max (ms)     min (ms)     std (ms)
  99.4650      99.2682      107.4937     98.4414       0.9779

$ tvmc  run --inputs imagenet_cat.npz --output predictions.npz --print-time --repeat 100  resnet50-v2-7-tvm.tar
Execution time summary:
 mean (ms)   median (ms)    max (ms)     min (ms)     std (ms)
  129.9993     127.4727     140.0776     126.1492      4.3682
mcpu 参数的支持
tvm 中对 target 的选择,mcpu 的支持,是基于 llvm 的,如果 –target 选择 llvm 的话。查看 llvm 支持的 cpus 为
clang -print-supported-cpus

	alderlake
	amdfam10
	athlon
	athlon-4
	athlon-fx
	athlon-mp
	athlon-tbird
	athlon-xp
	athlon64
	athlon64-sse3
	atom
	barcelona
	bdver1
	bdver2
	bdver3
	bdver4
	bonnell
	broadwell
	btver1
	btver2
	c3
	c3-2
	cannonlake
	cascadelake
	cooperlake
	core-avx-i
	core-avx2
	core2
	corei7
	corei7-avx
	generic
	geode
	goldmont
	goldmont-plus
	haswell
	i386
	i486
	i586
	i686
	icelake-client
	icelake-server
	ivybridge
	k6
	k6-2
	k6-3
	k8
	k8-sse3
	knl
	knm
	lakemont
	nehalem
	nocona
	opteron
	opteron-sse3
	penryn
	pentium
	pentium-m
	pentium-mmx
	pentium2
	pentium3
	pentium3m
	pentium4
	pentium4m
	pentiumpro
	prescott
	sandybridge
	sapphirerapids
	silvermont
	skx
	skylake
	skylake-avx512
	slm
	tigerlake
	tremont
	westmere
	winchip-c6
	winchip2
	x86-64
	x86-64-v2
	x86-64-v3
	x86-64-v4
	yonah
	znver1
	znver2
	znver3
3.2 编译流程总结
- 导入前端深度学习模型 CNN model configuration and parameters,生成计算图
- 重构原始计算图,基于operator-level优化图的计算
- 基于Tensor张量化计算图,并根据后端进行硬件原语级优化
- 根据优化目标探索搜索空间,找到最优解
- 生成硬件所需指令、并部署到硬件上

3.3 实例分析 - yolov3
使用 tvm 对 yolo v3 目标检测模型进行编译。本次实验环境为
cpu: intel i5 8250u
os: ubuntu 18.04
g++/gcc: 7.5.0
make: 4.1
conda: 4.5.12
python: 3.7.11
下载所需的文件
tvm 官网提示的脚本中的模型相关的文件链接有些已经失效,没法下载,所以需要自己准备模型相关的参数和配置。
在 github 上,clone 仓库 PyTorch-YOLOv3
git clone https://github.com/eriklindernoren/PyTorch-YOLOv3.git
下载 weights 文件
cd PyTorch-YOLOv3
./weights/download_weights.sh # 现在权重文件
下载完成后,准备如下两个文件
config/yolov3.cfg
yolov3.weights
准备 darknet 库
clone darknet 仓库
git clone https://github.com/pjreddie/darknet.git
将仓库切换到 yolov3 分支进行编译,如果是其他分支,因为库中有更新,会导致加载模型的时候抛出异常。将 Makefile 文件的开头参数设置成如下
GPU=0
CUDNN=0
OPENCV=0
OPENMP=0
DEBUG=0
本次实验环境是我的个人PC,没有GPU。然后使用 make 进行编译,生成 libdarknet.so 动态库文件。
性能分析对比
直接使用 darknet 进行推理
./darknet detect ../ml_model/yolov3/yolov3.cfg ../PyTorch-YOLOv3/yolov3.weights ../yolov3/data/images/bus.jpg

...
Loading weights from ../PyTorch-YOLOv3/yolov3.weights...Done!
../yolov3/data/images/bus.jpg: Predicted in 11.280314 seconds.
7
bus: 99%
person: 98%


使用 tvm 编译后,第一种是直接编译,第二种使用了量化优化,在进行的编译
Loading the test image...
Running the test image...
{'mean': 1044.8609760023828, 'median': 1044.8609760023828, 'std': 0.0}
{'mean': 3992.8165460005403, 'median': 3992.8165460005403, 'std': 0.0}
Funishing inference...
Show Outputs ......
loading yolov3 network...
layer     filters    size              input                output
    0 conv     32  3 x 3 / 1   416 x 416 x   3   ->   416 x 416 x  32  0.299 BFLOPs
    1 conv     64  3 x 3 / 2   416 x 416 x  32   ->   208 x 208 x  64  1.595 BFLOPs
    2 conv     32  1 x 1 / 1   208 x 208 x  64   ->   208 x 208 x  32  0.177 BFLOPs
    3 conv     64  3 x 3 / 1   208 x 208 x  32   ->   208 x 208 x  64  1.595 BFLOPs
    4 res    1                 208 x 208 x  64   ->   208 x 208 x  64
    5 conv    128  3 x 3 / 2   208 x 208 x  64   ->   104 x 104 x 128  1.595 BFLOPs
    6 conv     64  1 x 1 / 1   104 x 104 x 128   ->   104 x 104 x  64  0.177 BFLOPs
    7 conv    128  3 x 3 / 1   104 x 104 x  64   ->   104 x 104 x 128  1.595 BFLOPs
    8 res    5                 104 x 104 x 128   ->   104 x 104 x 128
    9 conv     64  1 x 1 / 1   104 x 104 x 128   ->   104 x 104 x  64  0.177 BFLOPs
   10 conv    128  3 x 3 / 1   104 x 104 x  64   ->   104 x 104 x 128  1.595 BFLOPs
   11 res    8                 104 x 104 x 128   ->   104 x 104 x 128
   12 conv    256  3 x 3 / 2   104 x 104 x 128   ->    52 x  52 x 256  1.595 BFLOPs
   13 conv    128  1 x 1 / 1    52 x  52 x 256   ->    52 x  52 x 128  0.177 BFLOPs
   14 conv    256  3 x 3 / 1    52 x  52 x 128   ->    52 x  52 x 256  1.595 BFLOPs
   15 res   12                  52 x  52 x 256   ->    52 x  52 x 256
   16 conv    128  1 x 1 / 1    52 x  52 x 256   ->    52 x  52 x 128  0.177 BFLOPs
   17 conv    256  3 x 3 / 1    52 x  52 x 128   ->    52 x  52 x 256  1.595 BFLOPs
   18 res   15                  52 x  52 x 256   ->    52 x  52 x 256
   19 conv    128  1 x 1 / 1    52 x  52 x 256   ->    52 x  52 x 128  0.177 BFLOPs
   20 conv    256  3 x 3 / 1    52 x  52 x 128   ->    52 x  52 x 256  1.595 BFLOPs
   21 res   18                  52 x  52 x 256   ->    52 x  52 x 256
   22 conv    128  1 x 1 / 1    52 x  52 x 256   ->    52 x  52 x 128  0.177 BFLOPs
   23 conv    256  3 x 3 / 1    52 x  52 x 128   ->    52 x  52 x 256  1.595 BFLOPs
   24 res   21                  52 x  52 x 256   ->    52 x  52 x 256
   25 conv    128  1 x 1 / 1    52 x  52 x 256   ->    52 x  52 x 128  0.177 BFLOPs
   26 conv    256  3 x 3 / 1    52 x  52 x 128   ->    52 x  52 x 256  1.595 BFLOPs
   27 res   24                  52 x  52 x 256   ->    52 x  52 x 256
   28 conv    128  1 x 1 / 1    52 x  52 x 256   ->    52 x  52 x 128  0.177 BFLOPs
   29 conv    256  3 x 3 / 1    52 x  52 x 128   ->    52 x  52 x 256  1.595 BFLOPs
   30 res   27                  52 x  52 x 256   ->    52 x  52 x 256
   31 conv    128  1 x 1 / 1    52 x  52 x 256   ->    52 x  52 x 128  0.177 BFLOPs
   32 conv    256  3 x 3 / 1    52 x  52 x 128   ->    52 x  52 x 256  1.595 BFLOPs
   33 res   30                  52 x  52 x 256   ->    52 x  52 x 256
   34 conv    128  1 x 1 / 1    52 x  52 x 256   ->    52 x  52 x 128  0.177 BFLOPs
   35 conv    256  3 x 3 / 1    52 x  52 x 128   ->    52 x  52 x 256  1.595 BFLOPs
   36 res   33                  52 x  52 x 256   ->    52 x  52 x 256
   37 conv    512  3 x 3 / 2    52 x  52 x 256   ->    26 x  26 x 512  1.595 BFLOPs
   38 conv    256  1 x 1 / 1    26 x  26 x 512   ->    26 x  26 x 256  0.177 BFLOPs
   39 conv    512  3 x 3 / 1    26 x  26 x 256   ->    26 x  26 x 512  1.595 BFLOPs
   40 res   37                  26 x  26 x 512   ->    26 x  26 x 512
   41 conv    256  1 x 1 / 1    26 x  26 x 512   ->    26 x  26 x 256  0.177 BFLOPs
   42 conv    512  3 x 3 / 1    26 x  26 x 256   ->    26 x  26 x 512  1.595 BFLOPs
   43 res   40                  26 x  26 x 512   ->    26 x  26 x 512
   44 conv    256  1 x 1 / 1    26 x  26 x 512   ->    26 x  26 x 256  0.177 BFLOPs
   45 conv    512  3 x 3 / 1    26 x  26 x 256   ->    26 x  26 x 512  1.595 BFLOPs
   46 res   43                  26 x  26 x 512   ->    26 x  26 x 512
   47 conv    256  1 x 1 / 1    26 x  26 x 512   ->    26 x  26 x 256  0.177 BFLOPs
   48 conv    512  3 x 3 / 1    26 x  26 x 256   ->    26 x  26 x 512  1.595 BFLOPs
   49 res   46                  26 x  26 x 512   ->    26 x  26 x 512
   50 conv    256  1 x 1 / 1    26 x  26 x 512   ->    26 x  26 x 256  0.177 BFLOPs
   51 conv    512  3 x 3 / 1    26 x  26 x 256   ->    26 x  26 x 512  1.595 BFLOPs
   52 res   49                  26 x  26 x 512   ->    26 x  26 x 512
   53 conv    256  1 x 1 / 1    26 x  26 x 512   ->    26 x  26 x 256  0.177 BFLOPs
   54 conv    512  3 x 3 / 1    26 x  26 x 256   ->    26 x  26 x 512  1.595 BFLOPs
   55 res   52                  26 x  26 x 512   ->    26 x  26 x 512
   56 conv    256  1 x 1 / 1    26 x  26 x 512   ->    26 x  26 x 256  0.177 BFLOPs
   57 conv    512  3 x 3 / 1    26 x  26 x 256   ->    26 x  26 x 512  1.595 BFLOPs
   58 res   55                  26 x  26 x 512   ->    26 x  26 x 512
   59 conv    256  1 x 1 / 1    26 x  26 x 512   ->    26 x  26 x 256  0.177 BFLOPs
   60 conv    512  3 x 3 / 1    26 x  26 x 256   ->    26 x  26 x 512  1.595 BFLOPs
   61 res   58                  26 x  26 x 512   ->    26 x  26 x 512
   62 conv   1024  3 x 3 / 2    26 x  26 x 512   ->    13 x  13 x1024  1.595 BFLOPs
   63 conv    512  1 x 1 / 1    13 x  13 x1024   ->    13 x  13 x 512  0.177 BFLOPs
   64 conv   1024  3 x 3 / 1    13 x  13 x 512   ->    13 x  13 x1024  1.595 BFLOPs
   65 res   62                  13 x  13 x1024   ->    13 x  13 x1024
   66 conv    512  1 x 1 / 1    13 x  13 x1024   ->    13 x  13 x 512  0.177 BFLOPs
   67 conv   1024  3 x 3 / 1    13 x  13 x 512   ->    13 x  13 x1024  1.595 BFLOPs
   68 res   65                  13 x  13 x1024   ->    13 x  13 x1024
   69 conv    512  1 x 1 / 1    13 x  13 x1024   ->    13 x  13 x 512  0.177 BFLOPs
   70 conv   1024  3 x 3 / 1    13 x  13 x 512   ->    13 x  13 x1024  1.595 BFLOPs
   71 res   68                  13 x  13 x1024   ->    13 x  13 x1024
   72 conv    512  1 x 1 / 1    13 x  13 x1024   ->    13 x  13 x 512  0.177 BFLOPs
   73 conv   1024  3 x 3 / 1    13 x  13 x 512   ->    13 x  13 x1024  1.595 BFLOPs
   74 res   71                  13 x  13 x1024   ->    13 x  13 x1024
   75 conv    512  1 x 1 / 1    13 x  13 x1024   ->    13 x  13 x 512  0.177 BFLOPs
   76 conv   1024  3 x 3 / 1    13 x  13 x 512   ->    13 x  13 x1024  1.595 BFLOPs
   77 conv    512  1 x 1 / 1    13 x  13 x1024   ->    13 x  13 x 512  0.177 BFLOPs
   78 conv   1024  3 x 3 / 1    13 x  13 x 512   ->    13 x  13 x1024  1.595 BFLOPs
   79 conv    512  1 x 1 / 1    13 x  13 x1024   ->    13 x  13 x 512  0.177 BFLOPs
   80 conv   1024  3 x 3 / 1    13 x  13 x 512   ->    13 x  13 x1024  1.595 BFLOPs
   81 conv    255  1 x 1 / 1    13 x  13 x1024   ->    13 x  13 x 255  0.088 BFLOPs
   82 detection
   83 route  79
   84 conv    256  1 x 1 / 1    13 x  13 x 512   ->    13 x  13 x 256  0.044 BFLOPs
   85 upsample            2x    13 x  13 x 256   ->    26 x  26 x 256
   86 route  85 61
   87 conv    256  1 x 1 / 1    26 x  26 x 768   ->    26 x  26 x 256  0.266 BFLOPs
   88 conv    512  3 x 3 / 1    26 x  26 x 256   ->    26 x  26 x 512  1.595 BFLOPs
   89 conv    256  1 x 1 / 1    26 x  26 x 512   ->    26 x  26 x 256  0.177 BFLOPs
   90 conv    512  3 x 3 / 1    26 x  26 x 256   ->    26 x  26 x 512  1.595 BFLOPs
   91 conv    256  1 x 1 / 1    26 x  26 x 512   ->    26 x  26 x 256  0.177 BFLOPs
   92 conv    512  3 x 3 / 1    26 x  26 x 256   ->    26 x  26 x 512  1.595 BFLOPs
   93 conv    255  1 x 1 / 1    26 x  26 x 512   ->    26 x  26 x 255  0.177 BFLOPs
   94 detection
   95 route  91
   96 conv    128  1 x 1 / 1    26 x  26 x 256   ->    26 x  26 x 128  0.044 BFLOPs
   97 upsample            2x    26 x  26 x 128   ->    52 x  52 x 128
   98 route  97 36
   99 conv    128  1 x 1 / 1    52 x  52 x 384   ->    52 x  52 x 128  0.266 BFLOPs
  100 conv    256  3 x 3 / 1    52 x  52 x 128   ->    52 x  52 x 256  1.595 BFLOPs
  101 conv    128  1 x 1 / 1    52 x  52 x 256   ->    52 x  52 x 128  0.177 BFLOPs
  102 conv    256  3 x 3 / 1    52 x  52 x 128   ->    52 x  52 x 256  1.595 BFLOPs
  103 conv    128  1 x 1 / 1    52 x  52 x 256   ->    52 x  52 x 128  0.177 BFLOPs
  104 conv    256  3 x 3 / 1    52 x  52 x 128   ->    52 x  52 x 256  1.595 BFLOPs
  105 conv    255  1 x 1 / 1    52 x  52 x 256   ->    52 x  52 x 255  0.353 BFLOPs
  106 detection
Loading weights from /home/jona/Documents/programming/happy_coding/pycharm_workspace/tvm_study/yolov3/yolov3.weights...Done!
class:['bus 0.9842'] left:0 right:196 top:809 bottom:762
class:['person 0.999'] left:45 right:380 top:219 bottom:910
class:['person 0.9947'] left:691 right:406 top:805 bottom:892
class:['person 0.9915'] left:216 right:400 top:357 bottom:868
class:['person 0.5068'] left:0 right:581 top:68 bottom:867
可以看到推理速度提升了很多,但是经过量化优化之后的速度反而变慢了一些。这里应该需要更加细致的编译优化参数调整。

对比发现,经过编译后的模型推理速度加快了很多,但是,编译进行了两种,一种是正常编译,一种进行了量化优化,对比发现经过量化优化后的编译库,推理速度反而更慢。
增加自动调整的优化编译
number = 10
repeat = 1
min_repeat_ms = 0  # since we're tuning on a CPU, can be set to 0
timeout = 10  # in seconds

# create a TVM runner
runner = autotvm.LocalRunner(
    number=number,
    repeat=repeat,
    timeout=timeout,
    min_repeat_ms=min_repeat_ms,
    enable_cpu_cache_flush=True,
)

tuning_option = {
    "tuner": "xgb",
    "trials": 1000,
    "early_stopping": 100,
    "measure_option": autotvm.measure_option(
        builder=autotvm.LocalBuilder(build_func="default"), runner=runner
    ),
    "tuning_records": "yolov3-autotuning-without-quantize.json",
}

# begin by extracting the tasks from the onnx model
tasks = autotvm.task.extract_from_program(mod["main"], target=target, params=params)

# Tune the extracted tasks sequentially.
for i, task in enumerate(tasks):
    prefix = "[Task %2d/%2d] " % (i + 1, len(tasks))
    tuner_obj = XGBTuner(task, loss_type="rank")
    tuner_obj.tune(
        n_trial=min(tuning_option["trials"], len(task.config_space)),
        early_stopping=tuning_option["early_stopping"],
        measure_option=tuning_option["measure_option"],
        callbacks=[
            autotvm.callback.progress_bar(tuning_option["trials"], prefix=prefix),
            autotvm.callback.log_to_file(tuning_option["tuning_records"]),
        ],
    )

# compile the model
print("Compiling the model...")
with autotvm.apply_history_best(tuning_option["tuning_records"]):
    with tvm.transform.PassContext(opt_level=3, config={}):
        lib = relay.build(mod, target=target, params=params)

# save compiled library
path_lib = CUR_PATH + '/yolov3-tvm-without-quantize-autotvm-lib.tar'
lib.export_library(path_lib)
tuning option 中的 trials 参数,这里考虑到cpu性能的问题和调整时间的原因,设置的是1000,按照官方文档的说法,一般服务器cpu可以设置为 1500-2000,如果是 gpu 可是设置为 3000-5000,但是要考虑到硬件的性能,需要经过不断的尝试,权衡时间选出一个合适的参数。
不同的编译优化性能对比
经过 auto tuning 自动调整之后,选择最佳的优化策略进行编译,在我的个人PC上整个 auto tuning 的过程耗时 3 hours。看下性能对比

简单编译的性能要比relay经过量化后的编译的性能要好,经过量化后精度降低了。(正常来说,经过量化,精度降低,性能应该提升才对,这里可能是量化的参数不正确,而导致了更多的计算过程,下面的代码给出了量化过程,以供参考)。对比分析,经过auto tuning 自动调整后的模型,运行性能有了很大的提升。
### 量化过程
mod, params = relay.frontend.from_darknet(net, dtype=dtype, shape=data.shape)

# for quantize
s1 = mod
s2 = params

target = tvm.target.Target("llvm", host="llvm")
dev = tvm.cpu(0)

print("optimize relay graph ...")
with tvm.relay.build_config(opt_level=2):
    func = tvm.relay.optimize(mod, target, params)

# apply quantization
print("apply quantization ...")
with quantize.qconfig():
    mod = quantize.quantize(s1, s2)

# compile the model
data = np.empty([batch_size, net.c, net.h, net.w], dtype)
shape = {"data": data.shape}
print("Compiling the model...")
with tvm.transform.PassContext(opt_level=3):
    lib = relay.build(mod, target=target, params=params)
3.4 tvm 代码分析 - partial
调试方法
tvm核心代码是使用 c++ 语言编写的,所有的接口都是通过 PackedFunc 进行了封装,封装成了 python api 接口,供用户使用。在 tvm python module 中,tvmc 就是 tvm 封装的 python 接口,用户使用 python 接口的方式,调用 tvm 的接口对模型进行编译和部署。
跟踪调试时,python 代码可以使用 pdb 进行跟踪,而 c++ 代码使用 lldb/gdb 进行跟踪调试。
- 使用 debug 模式编译 tvm 源代码
- 使用 python debug,打断点,调试 python 程序,在断点处停下
- 使用 lldb/gdb attach 到python程序上,设置断点,continue。
- 到 python 程序中单步 next,直到进入 gdb 中的断点处,调试跟踪,打印函数调用栈,通过栈帧调用关系分析代码执行流程
python 与 c++ 接口之间的互调
c++ 注册函数
TVM_REGISTER_GLOBAL("ir.Module_FromExpr").set_body_typed(&IRModule::FromExpr)
注册一个全局函数
/*!
 * \brief Register a function globally.
 * \code
 *   TVM_REGISTER_GLOBAL("MyPrint")
 *   .set_body([](TVMArgs args, TVMRetValue* rv) {
 *   });
 * \endcode
 */
#define TVM_REGISTER_GLOBAL(OpName) \
  TVM_STR_CONCAT(TVM_FUNC_REG_VAR_DEF, __COUNTER__) = ::tvm::runtime::Registry::Register(OpName)

#define TVM_STR_CONCAT_(__x, __y) __x##__y
#define TVM_STR_CONCAT(__x, __y) TVM_STR_CONCAT_(__x, __y)

#define TVM_FUNC_REG_VAR_DEF static TVM_ATTRIBUTE_UNUSED ::tvm::runtime::Registry& __mk_##TVM
__COUNTER__ 是编译器内置的宏,初始值为 0,在编译器没出现一次,就会自增 1
如果是 ,上述宏展开就是
static TVM_ATTRIBUTE_UNUSED ::tvm::runtime::Registry& __mk_TVM{0 .. n} = ::tvm::runtime::Registry::Register("ir.Module_FromExpr").set_body_typed(&IRModule::FromExpr)
再看下 Register 这个类的构造函数
/*!
   * \brief Register a function with given name
   * \param name The name of the function.
   * \param override Whether allow oveeride existing function.
   * \return Reference to theregistry.
   */
  TVM_DLL static Registry& Register(const std::string& name, bool override = false);
注册一个名称为 ir.Module_FromExpr 的函数,并设置函数体为 IRModule::FromExpr 封装成的 PackedFunc
python 调用函数
在 python/tvm/relay/frontend/onnx.py 中,加载 onnx 模型调用 from_onnx
...
return IRModule.from_expr(func), self._params
from_expr 函数中
return _ffi_api.Module_FromExpr(expr, funcs, defs)
_ffi 就是 tvm.ir 的接口
tvm._ffi._init_api("ir", __name__)
在 tvm/_ffi/_cython/registry.py 中
def _init_api(namespace, target_module_name=None):
    """Initialize api for a given module name

    namespace : str
       The namespace of the source registry

    target_module_name : str
       The target module name if different from namespace
    """
    target_module_name = target_module_name if target_module_name else namespace
    if namespace.startswith("tvm."):
        _init_api_prefix(target_module_name, namespace[4:])
    else:
        _init_api_prefix(target_module_name, namespace)
调用关系如下所示
_init_api_prefix -> get_global_func(name) -> _get_global_func(name, allow_missing)

-> check_call(_LIB.TVMFuncGetGlobal(c_str(name, ctypes.byref(handle)))
看下 _LIB 的定义
_LIB, _LIB_NAME = _load_lib()
_load_lib 就是去加载 libtvm.so 这个动态链接库,那就是说,加载动态库之后,在动态库中,查找所需要的函数,这个函数,在 c++ 中注册了,就在 libtvm.so 中
TVMFuncGetGlobal 函数在 src/runtime/registry.cc:197 中定义
int TVMFuncGetGlobal(const char* name, TVMFunctionHandle* out) {
  API_BEGIN();
  const tvm::runtime::PackedFunc* fp = tvm::runtime::Registry::Get(name);
  if (fp != nullptr) {
    *out = new tvm::runtime::PackedFunc(*fp);  // NOLINT(*)
  } else {
    *out = nullptr;
  }
  API_END();
}
通过函数名,查找注册的函数。这样,就从 python 端调用到了 c++ 注册的函数了。
tvm 的日志系统
编译时在 config.cmake 文件中设置 USE_RELAY_DEBUG ON,在 CMakeLists.txt 中,
if(USE_RELAY_DEBUG)
  message(STATUS "Building Relay in debug mode...")
  target_compile_definitions(tvm_objs PRIVATE "USE_RELAY_DEBUG")
  target_compile_definitions(tvm_objs PRIVATE "TVM_LOG_DEBUG")
  target_compile_definitions(tvm_runtime_objs PRIVATE "USE_RELAY_DEBUG")
  target_compile_definitions(tvm_runtime_objs PRIVATE "TVM_LOG_DEBUG")
  target_compile_definitions(tvm_libinfo_objs PRIVATE "USE_RELAY_DEBUG")
  target_compile_definitions(tvm_libinfo_objs PRIVATE "TVM_LOG_DEBUG")
else()
  target_compile_definitions(tvm_objs PRIVATE "NDEBUG")
  target_compile_definitions(tvm_runtime_objs PRIVATE "NDEBUG")
  target_compile_definitions(tvm_libinfo_objs PRIVATE "NDEBUG")
endif(USE_RELAY_DEBUG)
USE_RELAY_DEBUG 开关打开后,就会在编译选项中添加 -DUSE_RELAY_DEBUG 的参数了
同时,设置 TVM_LOG_DEBUG 环境变量
export TVM_LOG_DEBUG="DEFAULT=2"
这是整体的设置,可以设置单个文件的日志级别
export TVM_LOG_DEBUG="relay/ir/transform.cc=2"
以 VLOG(level) 为例
#define VLOG(level)                                                               \
  DLOG_IF(INFO, ::tvm::runtime::detail::VerboseLoggingEnabled(__FILE__, (level))) \
      << ::tvm::runtime::detail::ThreadLocalVLogContext::Get()->str()
宏函数展开,看下DLOG_IF 的定义
#define DLOG_IF(severity, condition) \
  LOG_IF(severity, ::tvm::runtime::detail::DebugLoggingEnabled() && (condition))

#define LOG_IF(severity, condition) \
  !(condition) ? (void)0 : ::tvm::runtime::detail::LogMessageVoidify() & LOG(severity)
VerboseLoggingEnabled 函数,首先查看 TVM_LOG_DEBUG 环境中设置的对应的文件名及其对应的值,然后将 level 与该值比较,返回
return level <= value
比如 VLOG(0) ,如果环境变量的值为 DEFAULT 就默认是全局的配置,那么 VerboseLoggingEnabled 返回就是 true,宏展开后
DLOG_IF(INFO, true) << ::tvm::runtime::detail::ThreadLocalVLogContext::Get()->str()
::tvm::runtime::detail::ThreadLocalVLogContext::Get()->str() 相当于日志输出的一个上下文字符串信息,在日志信息前面打印,继续展开
LOG_IF(INFO, ::tvm::runtime::detail::DebugLoggingEnabled())
因为 condition 是 true,可以直接省略。因为环境变量已经设置,在 ParseSpec 解析环境时,dlog_enabled_ 就设置成了 true,所以 DebugLoggingEnabled() 也返回true,宏继续展开
!(condition) ? (void)0 : ::tvm::runtime::detail::LogMessageVoidify() & LOG(severity)
condition 是 true,所以就成了
::tvm::runtime::detail::LogMessageVoidify() & LOG(INFO)
LOG(INFO) 就展开成 LOG_INFO
#define LOG(level) LOG_##level
#define LOG_FATAL ::tvm::runtime::detail::LogFatal(__FILE__, __LINE__).stream()
#define LOG_INFO ::tvm::runtime::detail::LogMessage(__FILE__, __LINE__).stream()
#define LOG_ERROR (::tvm::runtime::detail::LogMessage(__FILE__, __LINE__).stream() << "Error: ")
#define LOG_WARNING (::tvm::runtime::detail::LogMessage(__FILE__, __LINE__).stream() << "Warning: ")
这样日志信息就输出出来了,同时包含所在行和所在文件
reference
- Nimble: Efficiently Compiling Dynamic Neural Networks for Model Inference
- Relay: A High-Level Compiler for Deep Learning
- Ansor: Generating High-Performance Tensor Programs for Deep Learning
- Tvm: an automated end-to-end optimizing compiler for deep learning
- MLIR: A Compiler Infrastructure for the End of Moore’s Law
- Shredder: Learning noise distributions to protect inference privacy
- iree